Meme insider
How To Make Fake Screenshots Using Browser Dev Tools
When humorous, embarassing or scandalous screenshots are posted on social media, many fail to investigate their authenticity before circulating them. While this often takes the form of harmless pranks and jokes, it can also provide a vehicle for more harmful forms of misinformation. This guide provides a basic overview of how some of these images can be created, exposing the dangers of accepting the legitimacy of screenshots at face value.
Nonetheless, screenshots are notoriously simple to fake. Observe:

Wow, Don! I had no idea!
There are a slew of methods for faking text, but on the web it couldn't be easier. While other methods exist, such as Photoshop or fake post generators, we'll be focusing on a more reliable technique used to fool gullible web users: your browser's Developer Tools, colloquially known as "Inspect Element." To demonstrate, we'll be using this tweet posted by Don from Know Your Meme.

Inspect Element and Browser Dev Tools
Online, many refer to a browser's web developer tools as "Inspect Element," as the tools are typically accessed by right-clicking an element on a page and clicking the "Inspect Element" menu option. This opens an interface allowing the user to highlight the selected element. In Chrome, Edge and Firefox, you can also open this menu by pressing F12, which may be quicker if you're looking to change more than just one element or your edits require additional support, such as JavaScript or mucking with networking.
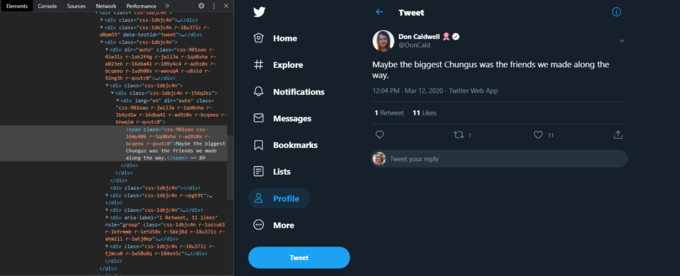
Here's what it looks like, alongside Don's original tweet.

Before creating the fake screenshot it's recommended to stop the page from continuing to load, as many websites have a background task running to fetch additional data and update the page, which may result in your hard work being overwritten by a page update. To prevent this, you can typically find an option to turn off additional networking requests. In Chrome, you can find this as a dropdown under Dev Tools (F12) > Network tab, where you can change the "Online" dropdown to "Offline."

This is normally used by devs to test how a web page will fare under abnormal network conditions, but here we're using it to avoid having the changes we make reverted.
Now, back to Inspect Element. The window that is opened is a modifiable version of the source HTML. Contrary to popular belief, this actually is not the HTML itself. It's actually a convenient representation of the browser's DOM which makes it far easier to edit. In the past, browsers didn't have dev tools, but instead only had a "view source" button, which simply displayed an immutable copy of the source HTML. Needless to say, faking web page results took a few extra steps back then.
Changing Text Using Inspect Element
Text on the web is, by far, the easiest part to change. As you may now be familiar (or already were), right-clicking on a web page gives you the option to "Inspect Element," at least on most modern browsers.
While the resulting "HTML" is simply a convenience tool, this convenient representation of the source HTML makes it a breeze to fake web text. The element itself, in the dev tool's text area, will typically be wrapped in a "tag," as shown below. Simply select the text between the tag and replace it. You're all done!

It's so easy, it's scary! Remember this next time you see a suspiciously-convincing screenshot.
Modifying Text Styling
This can be a little trickier, but is often very similar across social media platforms. On Twitter, different text elements will likely have different styling as well. For example, hashtags and profile tags have a blue styling, with the profile name in bold white text.
These differences in styling are applied using CSS, a simple language which provides colors, sizing and positioning modifications to HTML elements. CSS styles are organized into "classes," which are a collection of CSS styling rules which can be reused across any number of elements.
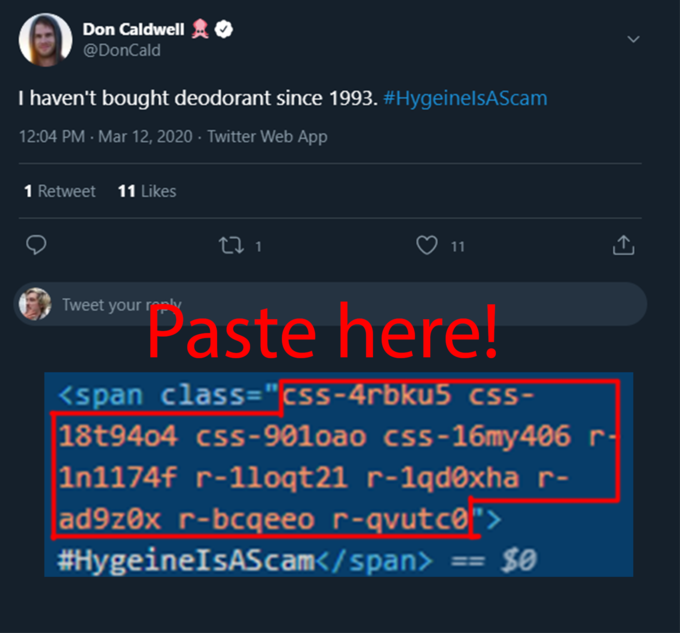
On most platforms, you don't really need to bother writing your own CSS or painstakingly selecting the correct class to apply; just find an element with the desired styling, copy the entire contents of the "class" property on the desired element (such as a hashtag) and paste this as the "class" property on the target tag.

Simply "copy" the styling from the source (in this case, a hashtag) and paste it onto the "class" property of the text you want to convert to a hashtag.

Note: If you need to add this styling in-line, you'll need to give the desired text its own element. The simplest way to do this is to duplicate the text block into three "span" blocks: one for the prior text and one for the following text, with the styled block in the middle.
Changing an Image
Changing an image varies wildly by platform, but in a simple case, selecting the image element and replacing the "src" or "srcset" attribute with a URL pointing to an alternative image will work. Easy!
In this example, we locate the "srcset" attribute of the Instagram image:

And replace it with our own, more tasteful image.

However, many sites (such as Twitter) have strict content policy directives which make this far more difficult. Replacing an image is certainly possible on sites with strict directives such as this, but solutions are often platform-specific and beyond the scope of this guide; just know that it is, indeed, possible, and that if all else fails, Photoshop will do.
This guide has only scratched the surface of the capabilities we have at our disposal for "doctoring" web pages, right from the comfort of our own browser! When confronted with a screenshot, your best bet is to remain skeptical about its authenticity until you are able to verify the corresponding post itself.
Meme Insider is a Know Your Meme publication and the world's leading internet trends and culture magazine. Find out how to get your first print copy for free, and check out the Meme Insider website for more info.

Comments ( 10 )
Sorry, but you must activate your account to post a comment.